In Part 1 of this tutorial, I gave a quick overview of how to quickly model a residential house (walls, roof, framing), using the 1001bit Tools extension. In this post, I’ll show a few more of these tools, to punch holes in the wall and detail out grills.
The tools I’ll show here are for openings, panels, and louvers.

Parts 1-5 were in Part 1, which is why I’m starting here with Step 6.
Step 6: Window and Door Holes
We’ll continue with the model from Part 1; the walls are 6” thick x 11’ high. The walls are part of a group, but you don’t need to have the group open for editing to make holes in it. Click the Create Opening tool.
Like with the other 1001bit tools, you get a menu of parameters; here you can set the opening width and height. As an example, for a door opening you’d use something like 3’x8’. But enter something shallower, for a window opening.
Click Create Opening. You want to click the wall that’s getting the hole, but you must click on the point from which the hole will be measured, such as the lower left corner of the wall itself. The next two clicks set the horizontal and vertical distances from where you first clicked. After that last click, you get your hole. (Another way to do this is to have a reference point in the model where you want the hole to start. In this case, you’d click this reference point all three times.)
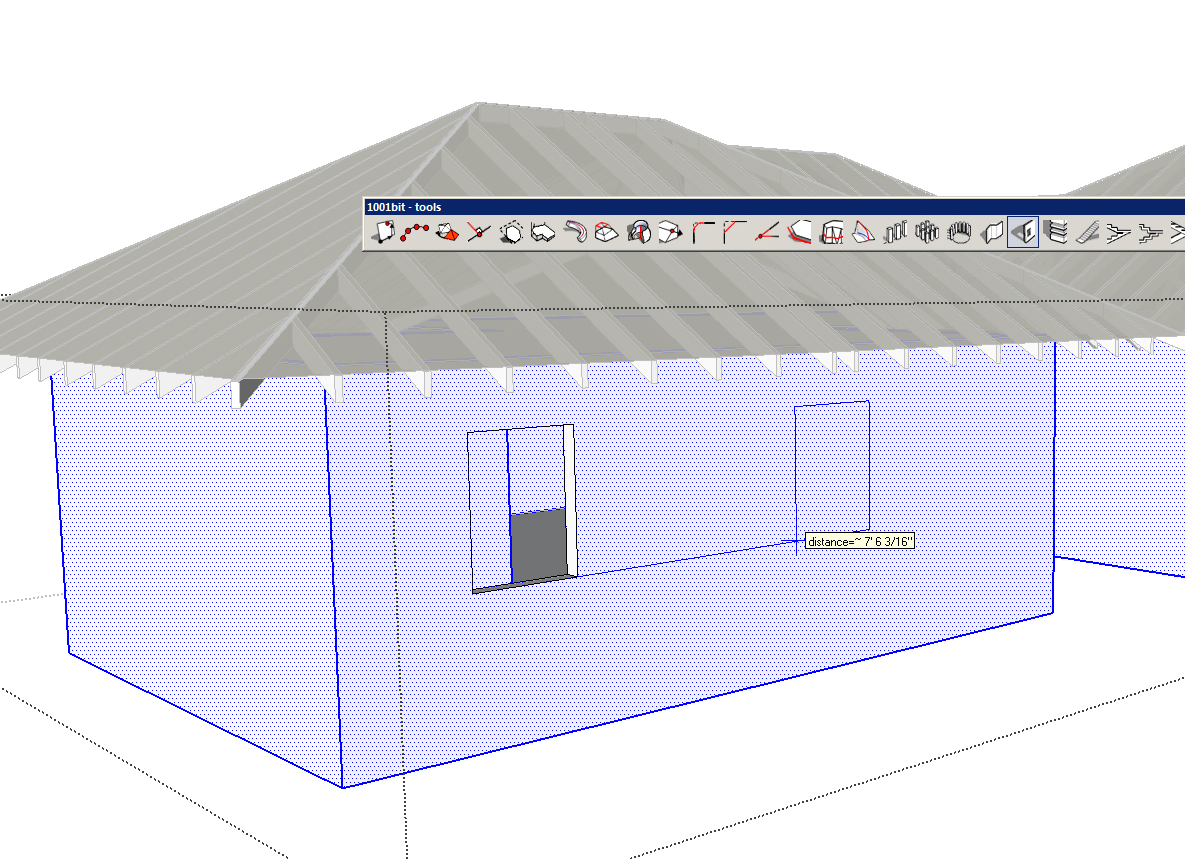
The window opening is now part of the wall group, and you can make changes to it (for example, Push/Pull to widen or shorten) by opening the wall group for editing. This will be useful for the next step.
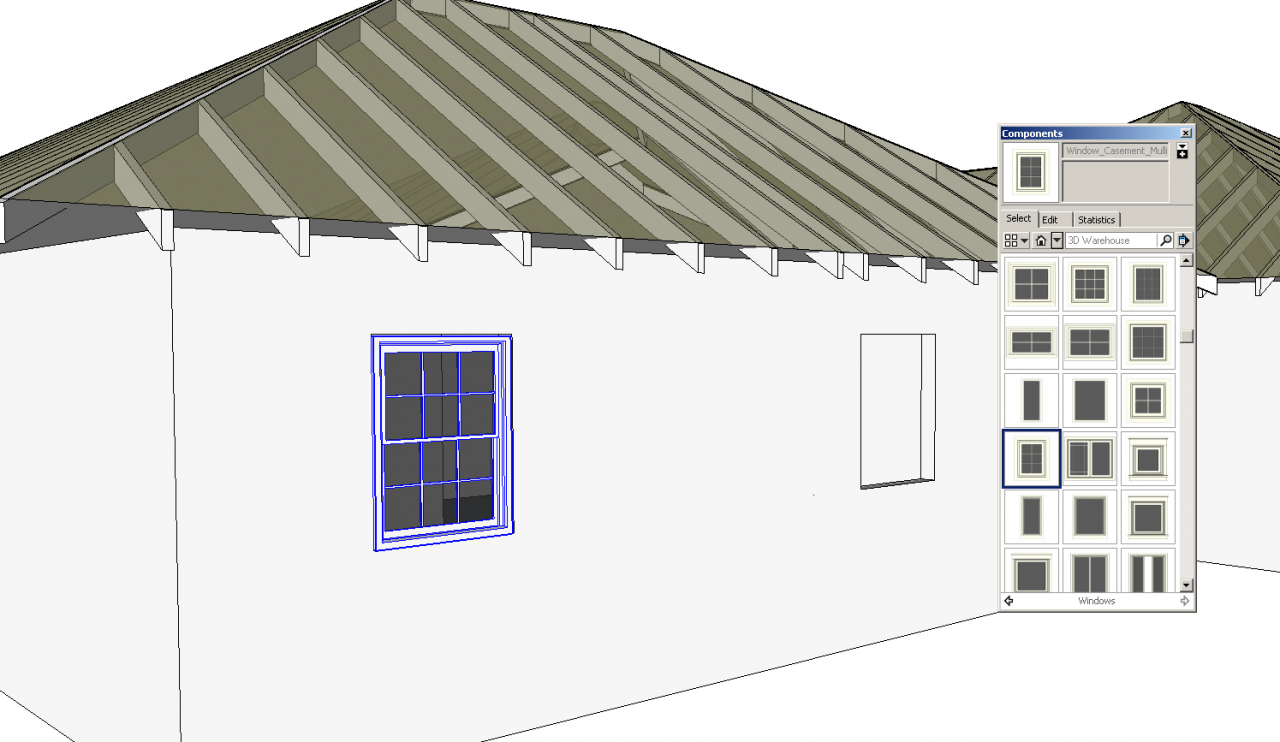
Step 7: Download Free Window Components
On my website, you can sign up for free access to video tutorials and around 3,000 SketchUp components. Among these SketchUp models are some windows and doors that would work well in this tutorial. You can also find the same components in the 3D Warehouse, which you can access from your Components window. Click the arrow next to the House icon, choose Architecture, and open the “Windows” collection. (There’s more info on linking SketchUp to component libraries on my SketchUp Basics Cheat Sheet, another free offering when you sign up on my site.)
Once you have a door or window model, it’s simple to place it in its opening. You can use the File / Import menu, or if you’re using the Components window, just click the model’s thumbnail. Place the object at the lower left corner of its opening. If the component is properly located and aligned, this should be easy. If needed, resize the opening to fit.
Step 8: Panels and Louvers
There are so many other tools I could demonstrate, but I’ll end with just two more.
The Panels tool is great for quickly creating window frames. Inside the wall group, draw a rectangle for a window cutout. Select the rectangle, using a double-click to select both the face and its edges. Now you can choose Make Component from the right-click menu (windows should always be components).
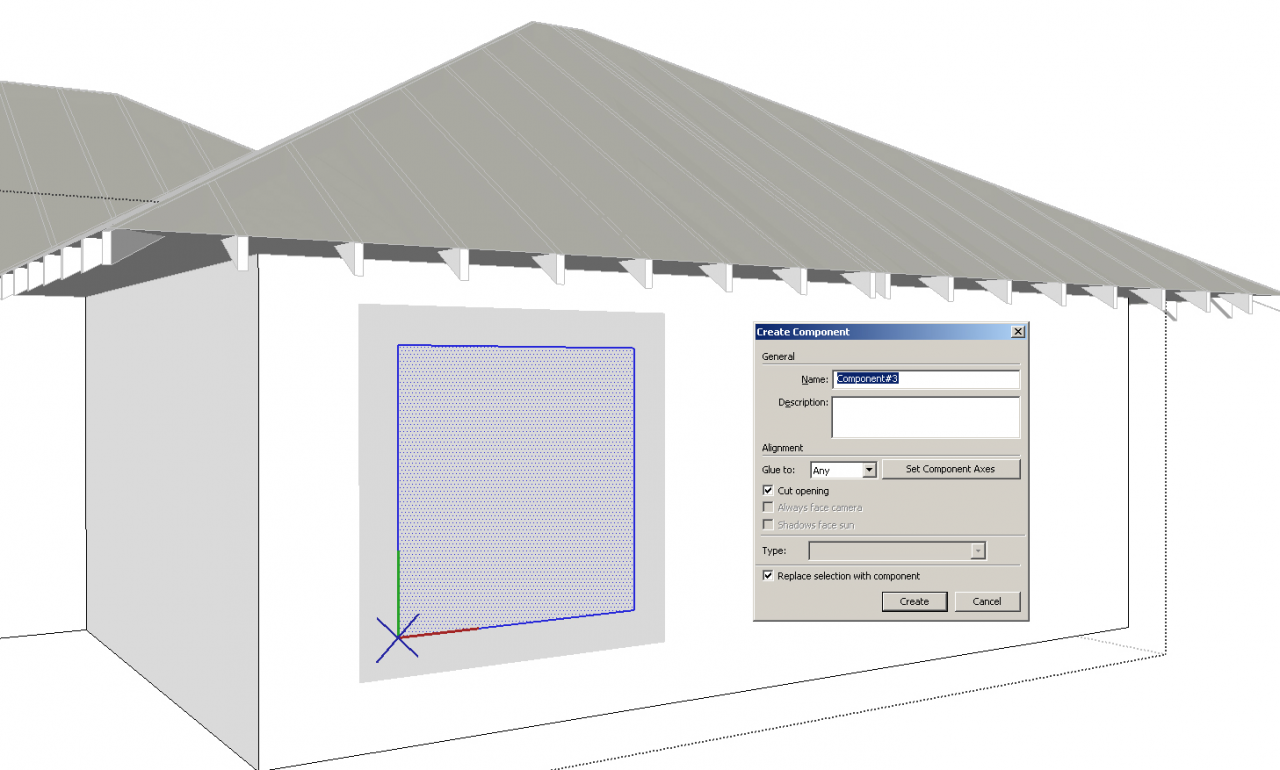
Edit the component, select the rectangle face (not the edges this time), and click the Panels tool. Adjust rows, columns, widths, depths, etc., then click Create Window Frame.
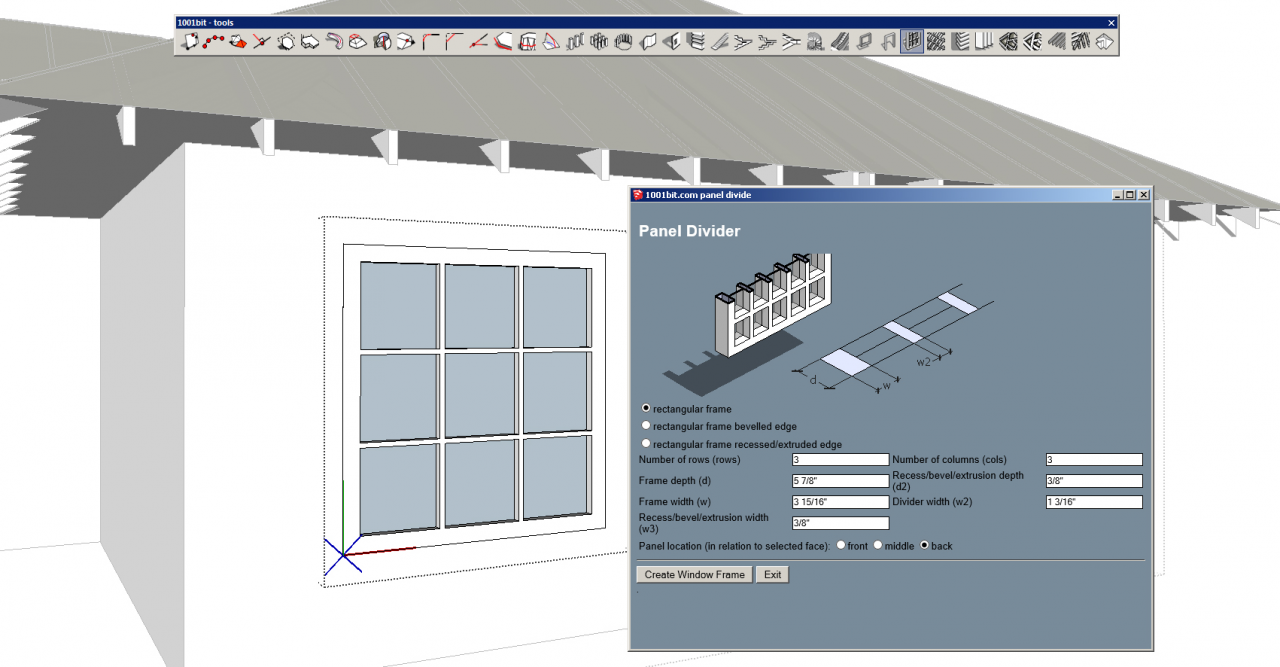
Because the window is a component, you can easily copy it.

A similar tool is Louvers. The process is the same as for panels:
- Create a rectangle and make it a group (or a component if the louvers will be copied)
- Open the group or component for editing and select the rectangle face
- Activate the louver tool, set the parameters, and create.
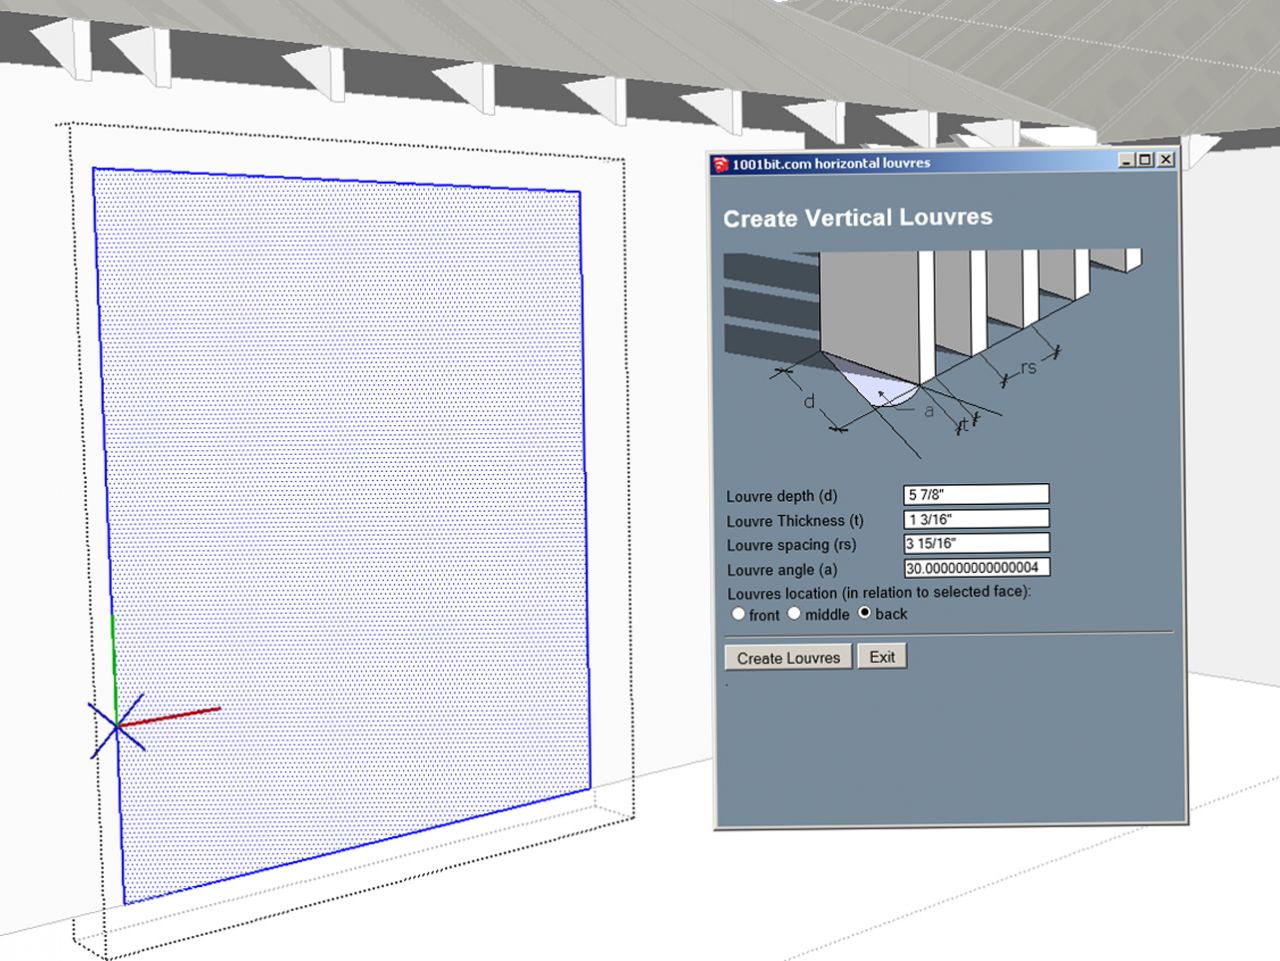
This grill would be pretty tedious to create by hand.

Step 9: Play!
Don’t close 1001bit’s huge toolbar before trying out some of the other tools. Particularly cool are Fillet, Chamfer, and Extend Edges (used in 2D). Not to mention you can create several types of stairs, linear and circular arrays, door and window frames, and more.
This free and powerful set of tools will increase your productivity, plus it’s also rather fun to use. Win/win.


Permalink
This tool look similar to some basic ArchiCad parametric setup for Architectural Elements. Nice, maybe i buy it! Thanks for share.
Permalink
There are many extensions for SketchUp now that function like tools in 3DS Max, Revit and ArchiCad. Also, 1001 Bit Tools is Free ware (there is a purchase option).
Permalink
Another well done article, Dan.
You should just about be able to hear the sound of my clapping hands if you listen closely!
Thank you, yet again!
Permalink
Love it thank you. Let me know if there is any content you want to see.
Thanks
Daniel
Permalink
So I downloaded 1001 Bit Tools (free) and it has a .MAN extension. This is a Unix extension. It is not recognized by Windows and it’s not a RUBY extension.
I guess you can change the extension to .RBZ and it might install in Sketchup but why did they complicate things. Their installation instructions say download the .rzb file. What am I missing here?
Permalink
Hey Jim
I went here: https://extensions.sketchup.com/en/content/1001bit-tools-freeware
And use download and it did give me the RBZ. Make sure you are logged into the Extension Warehouse (I am assuming your are) and please let me know.
Thanks
Daniel