The 1001bit Tools extension has been around for a long time, and should be a household name (in your SketchUp house). Written by a smart guy named Goh Hun Chee, it’s a free script you can install directly from the Extension Warehouse.
We’ll have a series of posts in the near future about finding and installing extensions, but here’s the short version: in SketchUp click the Extension Warehouse icon, look for 1001bit, and click Install. Pretty easy.
What You Get with 1001bit Tools
This extension contains 39 separate tools that automate the creation of parametric (we love parametric!) objects such as walls, doors, roofs, stairs, and more. Also included are about a dozen other utilities like fillets, extending edges, arrays, etc.
(There is also a Pro version, which includes more tools and editing features. It’s only US$48, with reduced prices for students / teachers.)
Many of these tools enable you to perform complex functions with a single click. Even better, you can set specific parameters – thickness, slope, etc. – allowing for highly customizable objects that would normally take a serious amount of modeling time to create.
This tutorial in Part 1 will demonstrate how to string together a series of 1001bit tools to generate an exterior floor plan for a house, including a parametric roof and corresponding framing. (Part 2 will show how to make holes for windows and doors, and window framing.)
Once you can complete something like this, it’s not hard to continue onto interior plans as well.
The three 1001bit tools I’ll discuss here are Build Vertical Walls, Create Rafters (framing), and Create Hip Roof.

Step 1: Build Walls
To start, draw a 2D footprint of a structure.

Click Build Vertical Walls, which opens a parametric menu where you can set the wall thickness and height. It’s good practice to create walls as a group.

I changed my wall properties to 6” thick x 11’ high.
Click Build Wall to start the tool, then click corner points along the footprint. You can use the keyboard arrows to lock the green or red directions if needed.
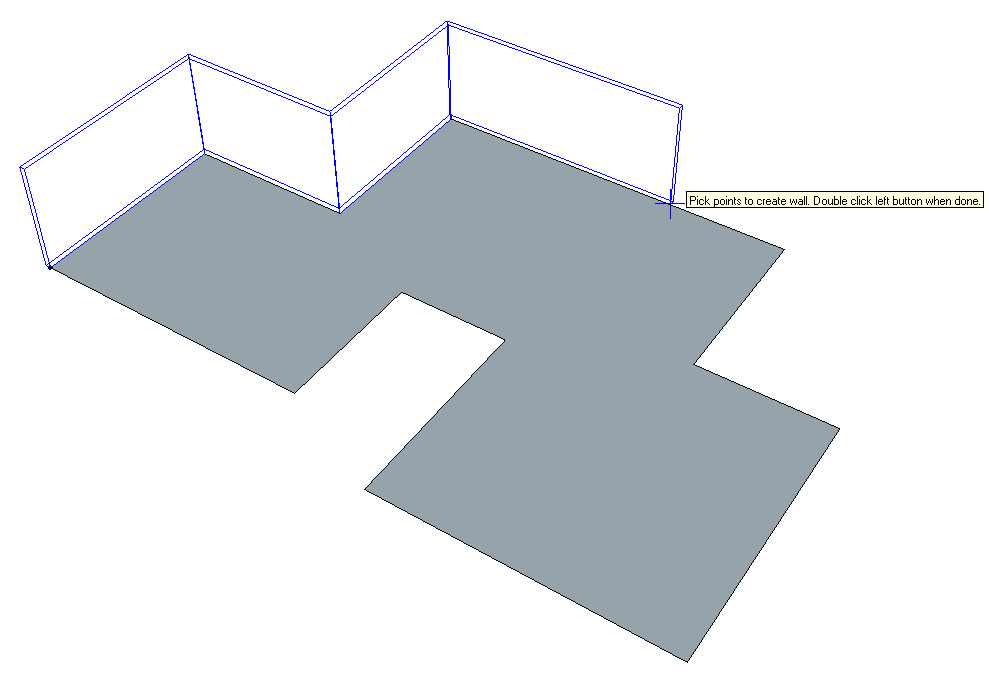 After you make your way all the way around the footprint, double-click on your start point and the walls are completed automatically. (If you don’t want a closed loop, double-clicking anywhere will end the walls.)
Step 2: Create Hip Roof
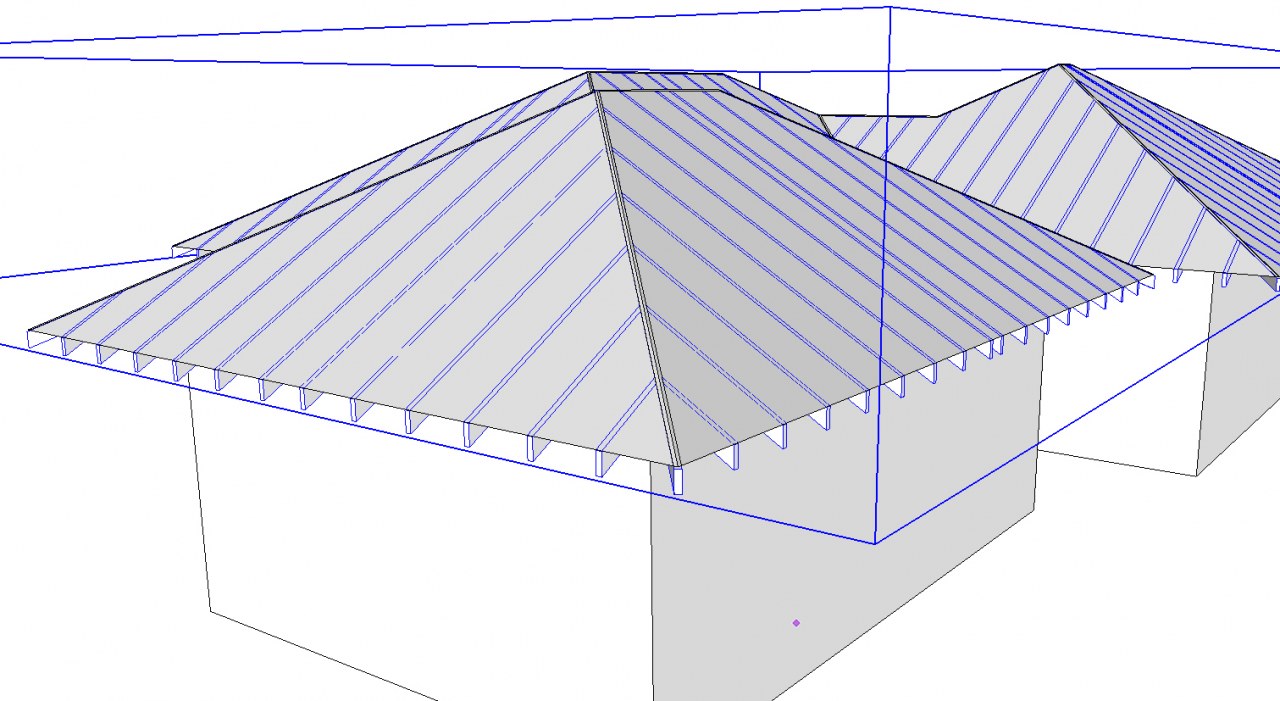
Using the Line tool, trace precisely around wall corners to create a flat face at the top of the walls. Then select this face and click the Create Hip Roof tool.
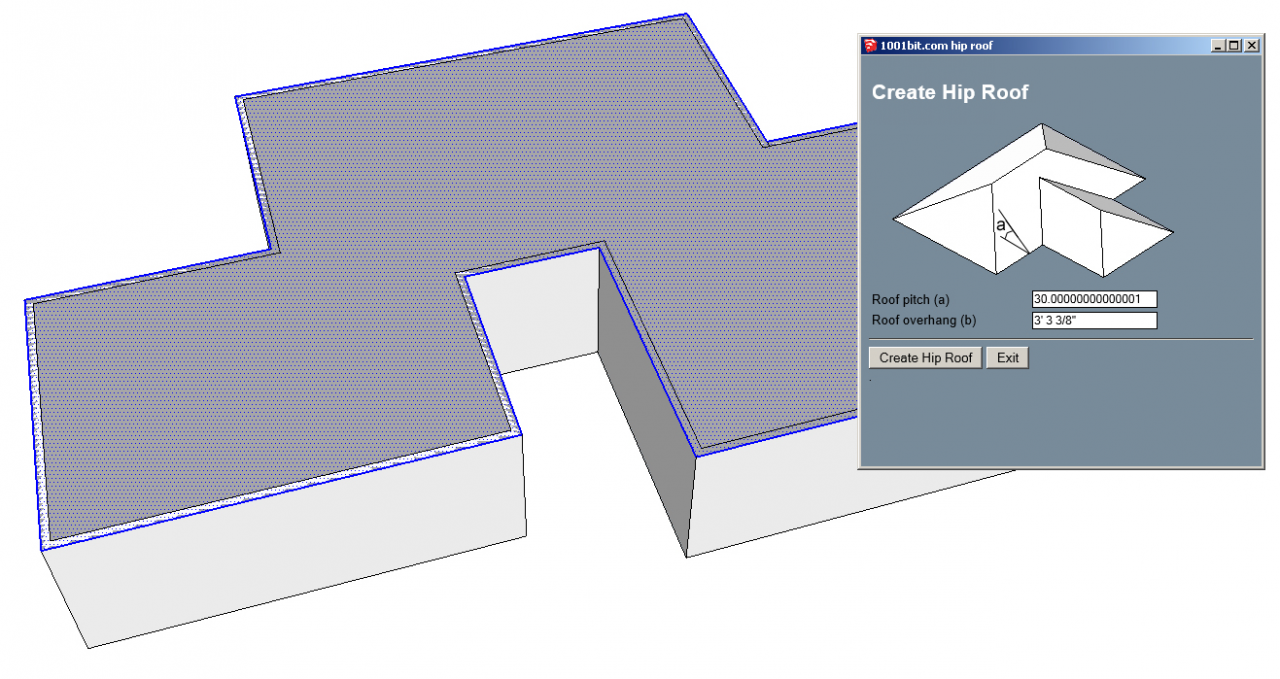 Set the roof pitch and overhang; I used 21 degrees and 5’ respectively. Then click Create Hip Roof.
 This works well almost all the time, but not always. If you get an error message, or unexpected results, try adjusting your roof parameters.
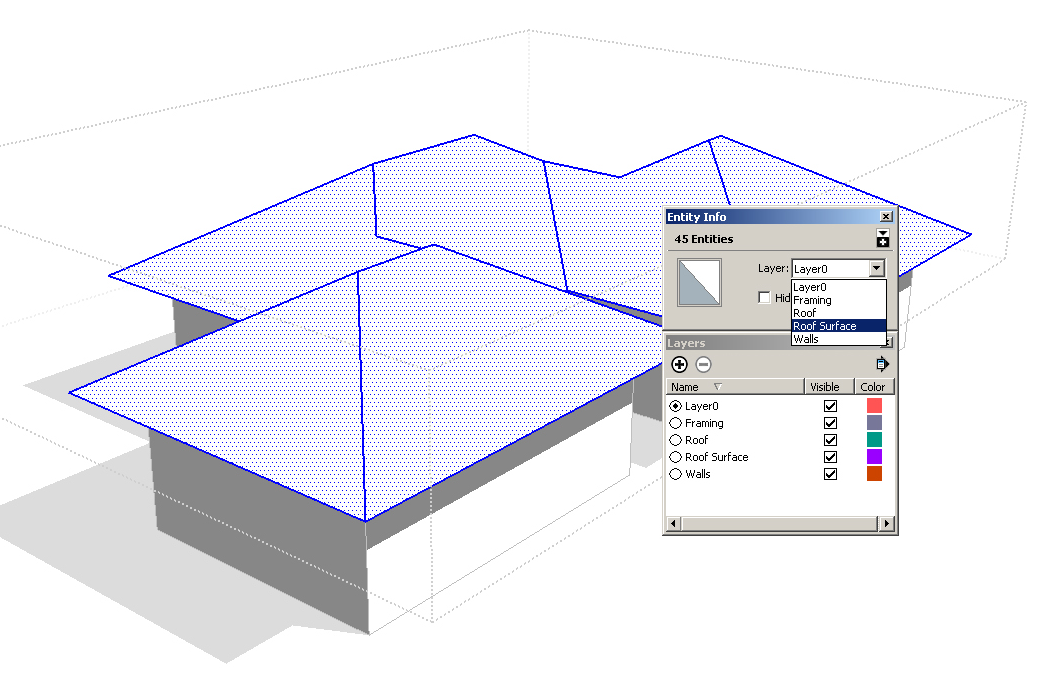
Step 3: Place Building Elements on Layers
A good SketchUp modeler always works with layers, placing similar objects on their own layer. This makes visualization much easier (you can toggle layers on and off for display purposes), which in turn makes plan generation much easier as well.
Open your Layers window and click the “plus” icon to create the following four layers: “Framing,” “Roof,” “Roof Surface,” and “Walls.”
Next, open the Entity Info window. Select the wall group and move it to the “Walls” layer.
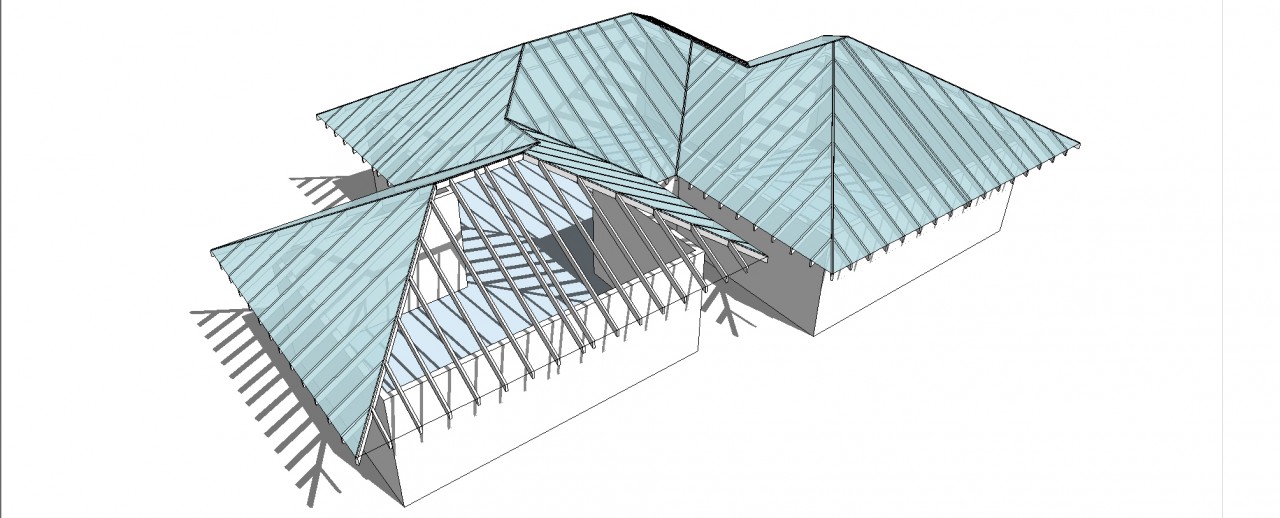
The roof itself is also a group. Open it for editing, and “drill down” into sub-groups until you can select the individual roof surfaces. Make sure all of these faces are selected, and place them on the “Roof Surface” layer.
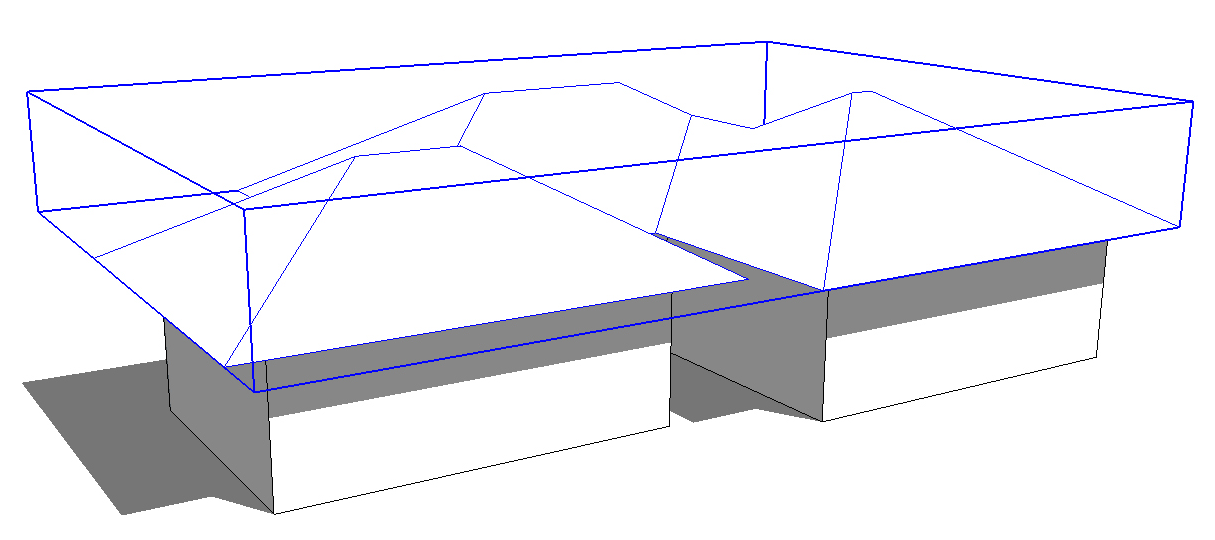
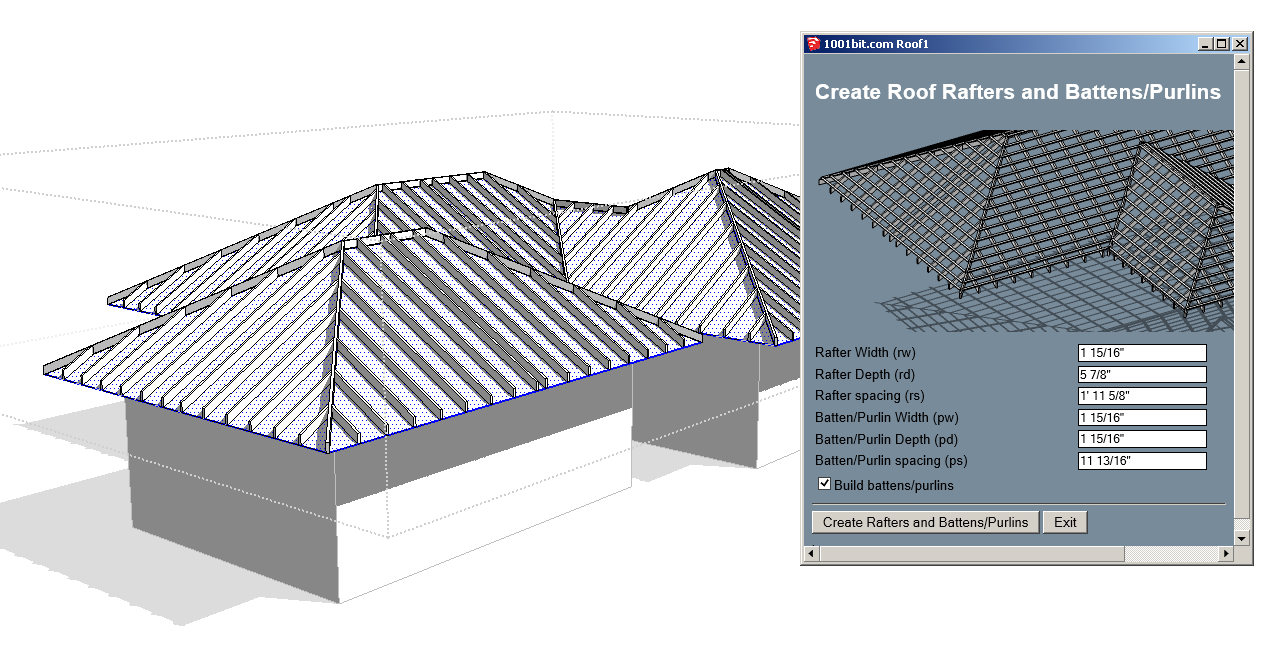
Step 4: Framing
With the roof surfaces still selected within their group, activate the Create Rafters tool. A rather detailed parametric menu will appear; change values or just use the defaults. Then click Create Rafters. The tool will run and create the roof framing. We’ll move the framing below the roof surface a bit further on.
 Toggle off the visibility of the “Roof Surface” layer, to hide the actual roof.
Now it’s easy to select all of the framing objects, then use the right-click menu to make them a group. Now the framing is a single, selectable entity.
The framing objects are now a group within the roof surfaces group that’s already open for editing. But the framing need to be a separate, main-level group on its own layer. So with the framing group still selected, choose Edit / Cut (or press Ctrl + X). Then close the roof group you’ve been editing, and return to the main modeling space. Choose Edit / Paste in Place to copy the framing group in the same location as before, but no longer inside another group.
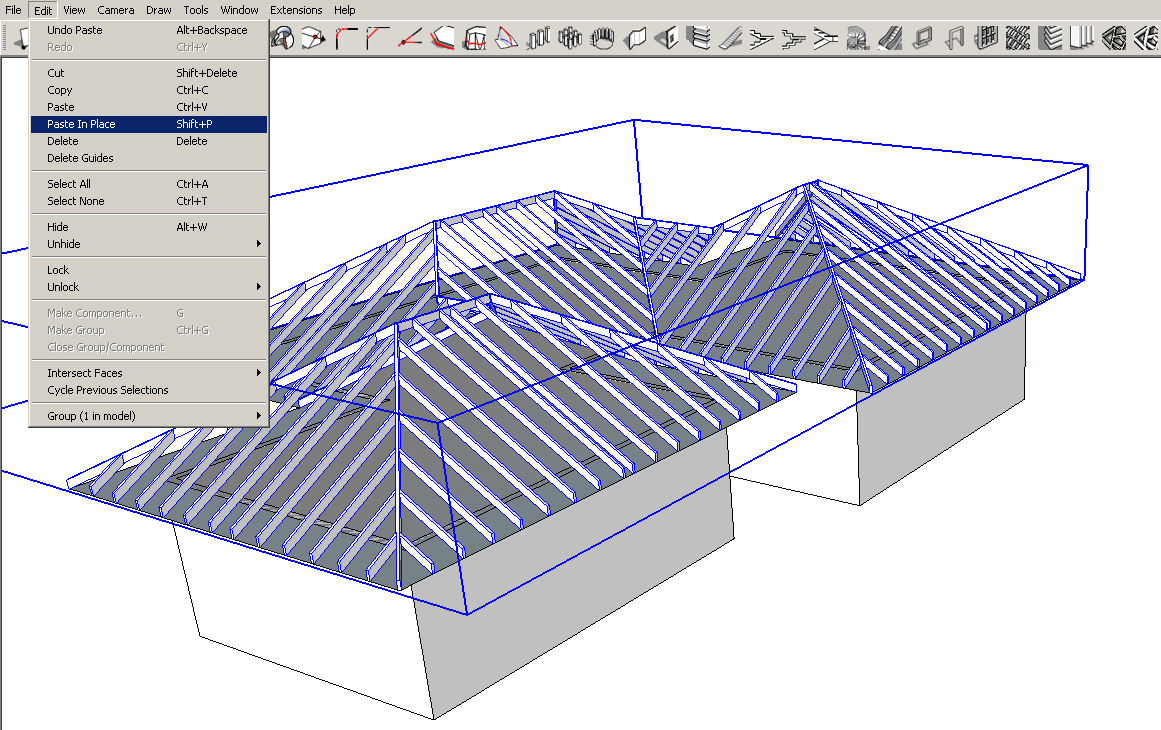
Then use Entity Info to place the framing group on the “Framing” layer.
Step 5: Move Framing Down
Toggle the “Roof Surface” layer back on.
Select the framing group . . .
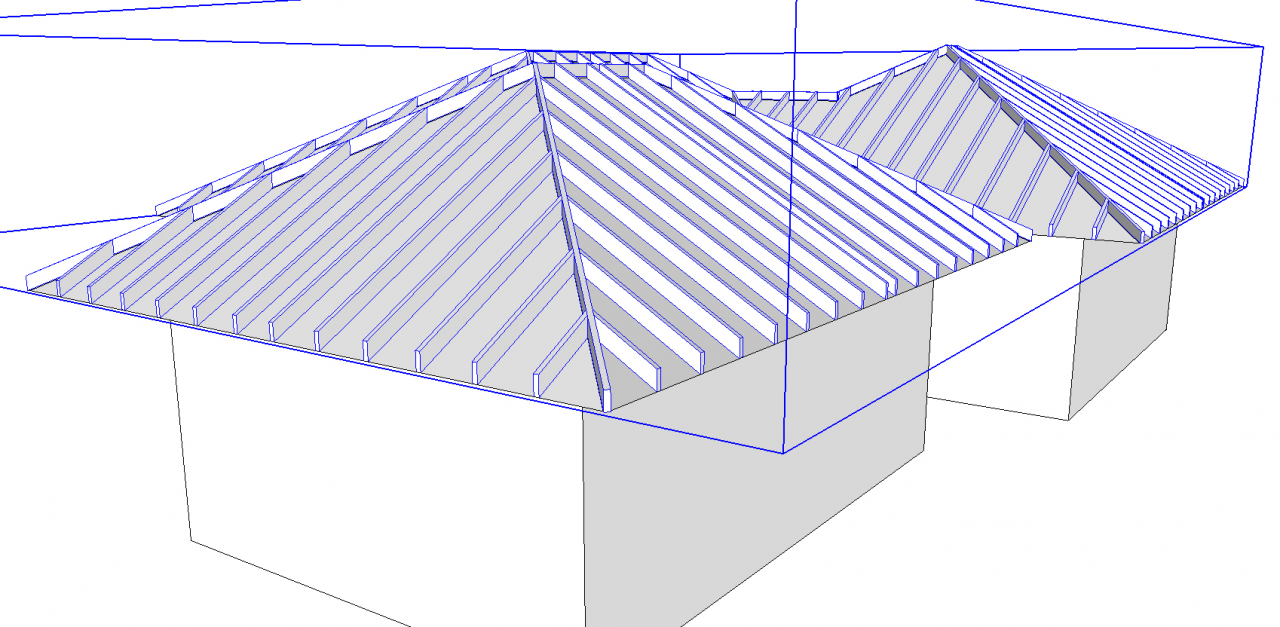
. . . and use the Move tool to slide the framing to just below the roof surface. Use the Up or Down key to lock the vertical (blue) direction.
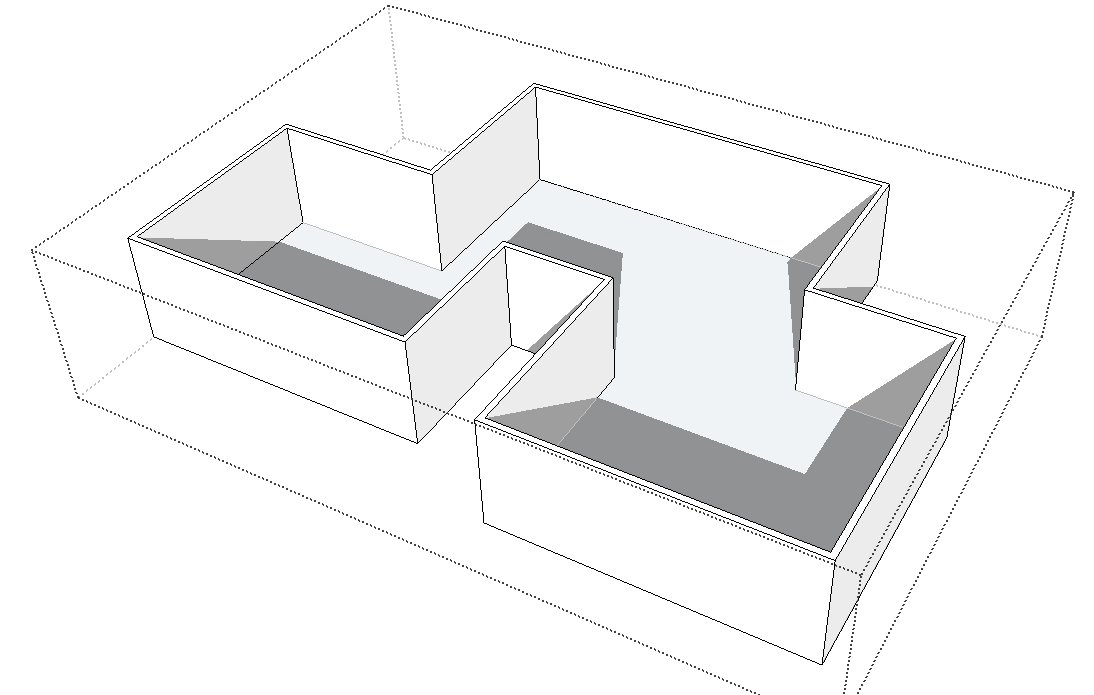
The base structure is now finished. The roof surface below is painted with a translucent material to better show the framing underneath.
Next, in Part 2 of this series, I’ll demonstrate how to use 1001bit tools to punch holes in the walls, add windows, and include more detailing to the structure.


Permalink
I need to give 1001bit Tools a second look.
Thanks Daniel
Permalink
These features are unbelievable. Who knew?
Permalink
Daniel, great extension. Thank you.
Is there a PDF to be familiar with all the tools for this extension?
Permalink
Great article, Daniel!
Your demonstration was excellent. I was not aware of the 1001 bit tools extension, but have downloaded it now. I’ve been drawing walls one stick of lumber at a time (for a hobby); so I’m expecting to really “up” my design past times now.
Thank you!!!
Permalink
Glad you all like the blog. Please share it With Others and let me know if you have requests!!!
Thanks
Daniel
Permalink
Daniel, as I said on my previous comment:
Is there a PDF to be familiar with all the tools for this extension?
Thank you.
Permalink
I’m not sure. Sorry. They do have an official website: http://www.1001bit.com/
And I think they review some of the features. Some of them are just worth playing around with – extending lines, trim, etc…
Permalink
I thought that you created this extension.
I’ve been trying and some tools and I just couldn’t figure out how they work.
I went to their website and try to register and couldn’t find the way to do it.
Any help?
Thank you in advance.
Permalink
Not my extension. I also don’t work for SketchUp. Just doing my own thing.
I am not sure you can register. Best thing to try to do is comment on the Extension Warehouse under the extension. And play around with the extension itself.
Thanks
Daniel
Permalink
Very nice. 2 questions:
1. Is there a way to create trusses, especially trusses incorporating at least a partial or semi vaulted ceiling?
2. Is there a way to tally lumber used?
Permalink
I am not sure about the trusses and no to #2. But there are other ways to estimate and add model detail.
Check out these two other extensions:
Instant Roof which is fully parametric for SketchUp:
https://valiarchitects.com/subscription_scripts/instant-roof-nui?redirect=no
And Estimator: https://extensions.sketchup.com/en/content/estimator-sketchup
While they are not free, they are super powerful for detailed, parametric construction and estimating.
Permalink
Amazing to stumble upon this article after having finished my house model a couple of hours ago. It took me a week to finish it and I was so proud.
Now I really look dumb.
Thank you for this humility lesson.
Permalink
I fully understand and hope it helped! There are so many automation tools for SketchUp it’s amazing.
Permalink
This is a great set of tools but when is it going to be updated to work with Sketchup 2016?
Permalink
Does it not install or work at all? I have it working in 2016.
Permalink
Thank you, Daniel!
This is a great toolkit. I’ve only just downloaded and installed it in SU 2016. FYI: During installation I saw a burp screen from SU saying that the extension does not pass authentication but it allowed me to install it anyway.
I went to your web site and tried to register for the forum but could not find a link to a registration page. Is your forum private only?
Again, thank you for sharing your marvelous work.
Permalink
Hi Rabbit Hutch,
I do not have a Forum but tutorials on my website (most free).
I do plan on hosting live Q&A sessions soon. I should be announcing those within several weeks.
Ignore the authentication message for now.
Thanks
Daniel
Permalink
After installing the extension I fiddled around with the placement of the various tools groups and made the 1001bit Tools group the last line in the menu area; however, I cannot see the hip roof tool. It apparently is off-screen at the right. The last one I see – and it is partly obscured – is the ridge rafter et al tool. What have I done wrong?
Again, thank you!
Permalink
Yeah, one of the bugs. You can try and move the tool bar over or if you have two monitors, move it to the second screen. No good answer to that one. I will do some testing.
Thanks
Daniel