In the previous post, Daniel showed a few features of SketchUp’s ever-popular Push/Pull tool. But when you’ve exhausted all that tool can do, it’s time to bring in the heavy hitters: the Joint Push Pull extension.
This extension has been around for a while, and once you have it you’re hooked. In this post, I’ll show a few simple examples of what it can do. In Part 2 of this series, Daniel will show a few more sophisticated examples of how JPP makes his life easier.
How to Get It
Joint Push Pull is one of the free extensions available from SketchUcation. (See our post on getting extensions from there.)
For JPP to work, you also have to find and install Fredo6’s library extension: “LibFredo6.”
Once installed (you might have to close and reopen SketchUp), here’s the toolbar:
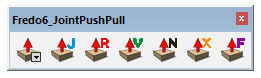
So many options, and to be honest I haven’t tried them all (but you should). I’m going to with the first one: the icon with the J. This tool is called Joint Push Pull, the same name as the overall extension. The other tools enable you to push and pull in different ways.
When you click that J icon, a rather overwhelming list of options appears along the top of the screen. These are broken up into categories such as “Face Selection,” “Finishing,” etc.

Hover over each of these – most of them are self-explanatory. These options provide an enormous amount of flexibility in your modeling.
Push/Pull Multiple Faces
SketchUp’s Push/Pull tool lets you pull up just one face at a time. Not so with JPP. In this example, I’m selecting faces to pull up, one at a time, then dragging the mouse to pull them all up. You can also enter an exact offset value. I’m using the “classic Push/Pull” option – the first one listed under the “Finishing” heading at the top.
You can also select all of your faces in advance. I’m trying the same thing now, but with the “Thicken” option under “Finishing.”
The only difference – a set of new faces is created above the old ones. Similar to what would happen if you used regular Push/Pull with the Ctrl or Option key.
Push/Pull Curved Faces
I love the expression on people’s faces when they see JPP work on curved faces.
Here I have a building with one curved face. The object is a hollow shell – its walls are paper-thin. JPP can thicken all faces at once.
This is a boon for models that are to be 3D printed.
The Round Push Pull tool produces similar results, but with rounded edges:
For curved faces, the Normal Push Pull tool produces some interesting results:
Next, in Part 2 of this series, Daniel will show off some of the cool things he’s done with Joint Push Pull.


Permalink
Do you have any video where I can see how the plugin works?